Still recapping the summer here but this costume post comes just in time for Halloween.
Fiona's BFF turned 5 in June and after his Mama blew my mind with some beautiful handmade doll bedding {I'll have to share that soon} for Feefs' birthday I knew I also wanted to get crafty for his gift.
Dress up is big in our house {and occasionally out of the house, like the grocery store, park, walk, etc.} and though Charlie has been a great sport dressing up in some pretty feminine frocks, I wanted to expand his options.
Presenting: Prince {Charl}ing.
I had in my mind something similar to Prince William's wedding wear.
I considered starting from scratch but that's not really my style.
I decided instead to source out an outfit I could repurpose.
A trip to Value Village delivered this lovely ensemble for the bargain price of $6.98.
Another $12 spent on the trimmings at Fabricland and I was all set.
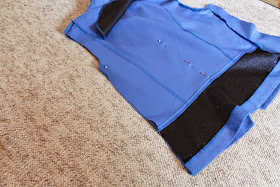
I started by turning the blazer inside out and ripping the side, shoulder and sleeve seams.
I used a jacket that I knew would fit Charlie and measured the width from collar to shoulder seam then marked that with a pin {remember to add 1.5cm for a seam allowance to each marking} on the blazer.
I then marked the midline and measuring the width of the torso on my model jacket to mark the side seam.


After cutting off all the extra by following the above pins on one side...
...I just folded the jacket in half on the midline that was already marked above and cut the second side to match.
To finish the torso I just sewed the side seams back together.
Now it was time to fit the sleeves.
Again, I grabbed the model jacket and measured the width of the sleeve at the top and bottom and pinned {with seam allowance} as well as the length.
After sewing the length of the sleeve and turning it right side out I fit it into the arm hole {you may have to work on this for a few minutes} and sew this seam.
A simple hem on the ends of the sleeves finishes them off.
I left the length as is since I wanted it a little long for the look but also so it would fit for a while.
I also left some extra length on the sleeves for the same reason.
The collar was an easy fix since lifting it up then folding it in on itself once made it quite princely.
I pinned some gold trim around the neck line before sewing the collar down to finish it off.
I started on the side with the buttons so that I could continue all the way down the front just inside the button holes.
After this I also replaced the buttons with some flashy gold ones.
The last detail on the jacket was to create some epaulettes.
Some simple fringe folded in half and sewn down the middle did the trick.
Before I fastened one shoulder's epaulette I wanted to attach a sash, this is where the bright red blouse came in.
I was lucky to find one with a little embellishment but one without could also work.
I cut the button down part from top to bottom, sewed the bottoms together then used the top button to secure the bottom of the sash after putting it on.
I slipped the whole thing under one epaulette then sewed it in place since we all know accessories tend to go missing on kid costumes if they're not attached.
And what kind of prince would he be without a crown right?
I actually don't know if I've ever seen Prince William sporting a crown but it still felt necessary.
I took a piece of gold lamé measured and cut to the diameter of Charlie's head {with an extra 3cm for seam allowance} then folded it in half and pinned it approximately every 3 inches.
I used the pins to guide the points of my cut but otherwise just winged it.
The crown could be made any shape or height here but I liked this simple look best.
Cedric was so excited about the crown {depicted below} that I was glad when my first attempt ended up a little small and could be kept for him.
To give the crown some standing power I cut some fusible batting the same size as my folded lamé then ironed it on.
I stitched along the top {with the batting facing out}, cut the edge a couple mm from the stitch {an important step otherwise you won't get a nice shape at the top} then turned it right side out.
Once you turn it you need to work the points out which I usually do by hooking a straight pin into the fabric and pulling from the outside.
To finish it off simply fold the ends of one side in, insert the other end into it and stitch on the outside {see below}.
I also bought some black pants and used the extra fabric from the blazer to sew a tuxedo stripe down the side but this is purely optional since plain black pants look just great.
Now we have a legitimate prince costume to match the many princess dresses.
Not to say this guy doesn't still rock the feminine garbs from time to time.


No comments:
Post a Comment
What do you think I auto know?